Showing posts with label electronics. Show all posts

Monday, 1 December 2014

LED LIT RIDING JACKET


 It has been quite a while since I posted anything here and am feeling a little guilty. But this does not mean that I have not been tinkering. I recently bought a tiny 150cc bike to navigate the crazy Nairobi traffic and when I ventured on the road I felt like a small grain sand in a sea of crazy PSVs and other motorists. After Purchasing my riding gear and using it for a while I decided to make it more visible by adding some wearable tech onto it using an LED strip arduino uno and a transistor TIP122. 


Posing with the bike


Riding jacket with LED strip on it, notice it at the elbow, waistline and back

How the jacket looks in the light, maybe it is too bright

And in the dark, amazing!

Arduino Uno thrown in the mix to add different lighting effects


The code that runs this jacket is simply a combination of the fading example and the blinking example that comes with the arduino IDE.
/*
 Fade
 
 This example shows how to fade an LED on pin 9
 using the analogWrite() function.
 
 This example code is in the public domain.
 */

int led = 3;           // the pin that the LED is attached to
int brightness = 0;    // how bright the LED is
int fadeAmount = 5;    // how many points to fade the LED by

// the setup routine runs once when you press reset:
void setup()  { 
  // declare pin 9 to be an output:
  pinMode(led, OUTPUT);
} 

// the loop routine runs over and over again forever:
void loop()  { 
  int x=0;
  for(x=0;x<255;x++){
  // set the brightness of pin 9:
  analogWrite(led, brightness);    

  // change the brightness for next time through the loop:
  brightness = brightness + fadeAmount;

  // reverse the direction of the fading at the ends of the fade: 
  if (brightness == 0 || brightness == 255) {
    fadeAmount = -fadeAmount ; 
  }     
  // wait for 30 milliseconds to see the dimming effect    
  delay(30); 
  }  
  
  for(x=0;x<5;x++){
  digitalWrite(led, HIGH);   // turn the LED on (HIGH is the voltage level)
  delay(1000);              // wait for a second
  digitalWrite(led, LOW);    // turn the LED off by making the voltage LOW
  delay(1000);              // wait for a second
  }
  
  for(x=0;x<10;x++){
  digitalWrite(led, HIGH);   // turn the LED on (HIGH is the voltage level)
  delay(500);              // wait for a second
  digitalWrite(led, LOW);    // turn the LED off by making the voltage LOW
  delay(500);              // wait for a second
  }
} 
 
 
Enjoy! 

Tuesday, 1 April 2014

making infrared intruder counter / alarm


Introduction

This is a gadget for counting the number of times an infrared beam of light is interrupted. It is arduino based and implemented with an atmega328 chip on a veroboard. This is an easy project and may take a day to put together.

The counter working

Parts required

  • 220 ohms resistors
  • 10k resistors 
  • 4 digit 7 segment display
  • atmega328p/ arduino uno
  • infrared photo transistor
  • infrared diode
  • 7805 voltage regulator
  • power source: 7.5Vdc to 15Vdc
  • buzzer

Connecting it together

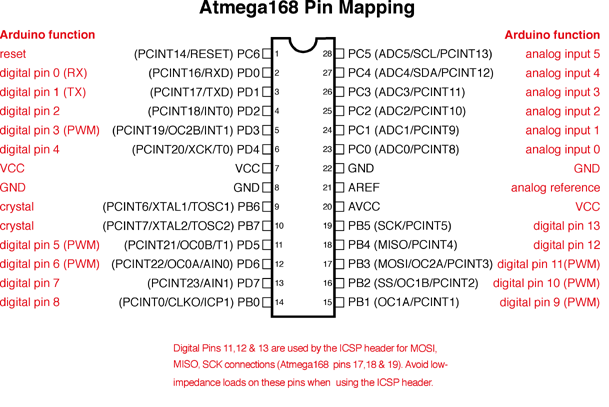
I use the pin mapping of the atmega328p from the arduino site and is also shown below. To protect the microcontroller pins from being destroyed by large currents that may flow, add 220 ohms resistors on the common cathodes or anodes of your display. 

For connecting the 4 digit  7 segment display use the assignment shown in the picture below. Just in case you have the same display I had, otherwise find the display pin assignment in the datasheet.


Connect the 4digit 7-segment display using pin assignement in the code and load the code to the MCU using a programmer. For me I use UsbTinyISP.

Code


/*Written by Dean Reading, 2012.  deanreading@hotmail.com
/Edited by Peter Mbari to Count number of Intruders using Infrared
 

 */

#include "SevSeg.h"

//Create an instance of the object.
SevSeg sevseg;

int sPin=12;
int buzzer=13;
int people=0;
//Create global variables
unsigned long timer;
int CentSec=0;

void setup() {
  //I am using a common anode display, with the digit pins connected
  //from 0-3 and the segment pins connected from 4-11
  sevseg.Begin(1,0,1,2,3,4,5,6,7,8,9,10,11);
  //Set the desired brightness (0 to 100);
  sevseg.Brightness(50);
  
  pinMode(sPin, INPUT);// Setup the Infared sensor pin as input
  
  pinMode(buzzer, OUTPUT);// Set Buzzer pin as output
  timer=millis();
}

void loop() {
  //Produce an output on the display
  sevseg.PrintOutput();
  
 if(digitalRead(sPin)==LOW)
 {
   people++;
  while(digitalRead(sPin)==LOW)sevseg.PrintOutput();
  digitalWrite(13,HIGH);  
  delay(500);
  digitalWrite(13, LOW);
 }
 
  
    //Update the number to be displayed, with a decimal
    //place in the correct position.
    sevseg.NewNum(people,(byte) 0);
  
}


Finaly after the board is assembled and working you get a nice display like the one shown in the video below.


Happy making


Monday, 8 July 2013

First Kenyan Online Electronics Store

I have been building electronics in Kenya for sometime now and the greatest challenge is getting the parts needed for the projects. A long time ago I learned how to scavenge for parts from broken electronics and repurpose them for my own projects. This however has changed due to the revolution that is taking place in the Kenyan DIY scene. Many more enthusiasts and students have access to materials, tools and information that I never had access to while learning.

Most of the components I got were discrete and hardly did I get the exact parts I wanted especially microcontrollers. As time went by I discovered the electronics shops in Luthuli avenue in Nairobi. These shops have many of the electronics parts needed to do simple projects. To successfully shop for parts here you need to know the street names of some of the components to get to buy them else you leave without them for lack of proper "street"communication. For instance a potentiometer is called "volume" which is only one of the many applications of this device as a volume control knob in audio electronics. This is partly due to the fact that some of the people selling these parts do not even have an idea what they are selling.

One of the shops though, Masimo electronics, stocks most of the parts a DIYer would love to have from microcontrollers to the peripherals but the  problem is the pricing.  Do not be surprised to find an arduino duemilanov going for Ksh 15,000 or a 3mm led going for Ksh15 which is way too high. This makes me think that most of their components are overpriced and it is quite discouraging that they are taking advantage. To add insults to an injury they do not have an online shop or even a catalog which  the customers can even browse or windowshop for parts. Time has come for businesses to go digital but these guys have a long way to go.

Long we had waited for this scenario to change and it did when nerokas, a kenyan online electronics store was established. This is the one stop shop for all the parts an electronics DIYer would need. From the famous arduino to microcontrollers, from the raspberry pi to leds,GSM modules and many other electronics parts. You can place your order in the morning, pay via m-pesa and get your package the same day within Nairobi or get the package delivered by a courier of your choice if you are outside Nairobi. And to crown the cake, their prices are very friendly.

Whether you are building electronics projects for fun or a school project, head straight their website, or visit their facebook page for a glimpse of what they stock and am sure you will be amazed.

Lets build this Engineering momentum together by promoting our one of our own as we gear up towards vision 2030!

If I can get it in Kenya, why import?

Electronics tutorials coming soon! watch this space.