Tuesday, 1 April 2014

making infrared intruder counter / alarm


Introduction

This is a gadget for counting the number of times an infrared beam of light is interrupted. It is arduino based and implemented with an atmega328 chip on a veroboard. This is an easy project and may take a day to put together.

The counter working

Parts required

  • 220 ohms resistors
  • 10k resistors 
  • 4 digit 7 segment display
  • atmega328p/ arduino uno
  • infrared photo transistor
  • infrared diode
  • 7805 voltage regulator
  • power source: 7.5Vdc to 15Vdc
  • buzzer

Connecting it together

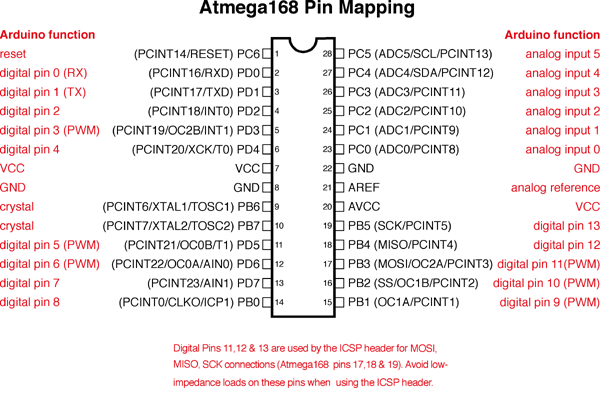
I use the pin mapping of the atmega328p from the arduino site and is also shown below. To protect the microcontroller pins from being destroyed by large currents that may flow, add 220 ohms resistors on the common cathodes or anodes of your display. 

For connecting the 4 digit  7 segment display use the assignment shown in the picture below. Just in case you have the same display I had, otherwise find the display pin assignment in the datasheet.


Connect the 4digit 7-segment display using pin assignement in the code and load the code to the MCU using a programmer. For me I use UsbTinyISP.

Code


/*Written by Dean Reading, 2012.  deanreading@hotmail.com
/Edited by Peter Mbari to Count number of Intruders using Infrared
 

 */

#include "SevSeg.h"

//Create an instance of the object.
SevSeg sevseg;

int sPin=12;
int buzzer=13;
int people=0;
//Create global variables
unsigned long timer;
int CentSec=0;

void setup() {
  //I am using a common anode display, with the digit pins connected
  //from 0-3 and the segment pins connected from 4-11
  sevseg.Begin(1,0,1,2,3,4,5,6,7,8,9,10,11);
  //Set the desired brightness (0 to 100);
  sevseg.Brightness(50);
  
  pinMode(sPin, INPUT);// Setup the Infared sensor pin as input
  
  pinMode(buzzer, OUTPUT);// Set Buzzer pin as output
  timer=millis();
}

void loop() {
  //Produce an output on the display
  sevseg.PrintOutput();
  
 if(digitalRead(sPin)==LOW)
 {
   people++;
  while(digitalRead(sPin)==LOW)sevseg.PrintOutput();
  digitalWrite(13,HIGH);  
  delay(500);
  digitalWrite(13, LOW);
 }
 
  
    //Update the number to be displayed, with a decimal
    //place in the correct position.
    sevseg.NewNum(people,(byte) 0);
  
}


Finaly after the board is assembled and working you get a nice display like the one shown in the video below.


Happy making


Thursday, 9 January 2014

Home-made UV exposure box for PCB prototyping

Earliest last year I wrote this  post on how to make printed circuit boards using the method of toner transfer. Since before then I have known that the method is not consistent in the results obtained. Sometime the toner does not stick evenly on the copper clad especially for bigger designs.

During the same period I made several PCB at the University of  Nairobi Electrical Engineering department and the boards were much more superior to the ones I had made before using the toner transfer method.


good pcb made using pre-sensitized copper clad  


double sided pcb exposure box 

controls for the pcb exposure box
The department has a double sided PCB exposure box that is proven to give very good results over the many years it has been in service. Problem is I can't access this machine at my  leisure and therefore I decided to make my own machine.

First I sourced for the UV bulbs that were available in Nairobi and then enlisted the help of a colleague to get the box designed. A press fit design was quickly put together and cut from left over mdf using a cnc router we have at the fablab and some pictures are shown below!

Cutting the parts on the Shopbot
Some of the cut parts ready for assembly


Filing the edges for a nice fit

The we put together the box by press fitting as shown in the pictures below.

Press fit Box for the top cover
The bottom was also cut and assembled in the same way. The UV bulbs were then fitted and the fun began. . . TESTING!


Putting the bulb holders in place


fitting the bulbs after fitting the reflective foil(kitchen foil works fine)

the complete assembly

fitting a paper cover for a quick and dirty testing session(Just couldn't wait to fix the plexi glass cover)
 After all this hard work, it was now time to test this baby! Having recently bought a can of UV curable solder mask paint I decided to see if it will cure in this UV light.
After several failed attempts mostly due to underexposure, the results were messy.

the messy results


At the point whre I almost gave up and almost  threw the box in the dustbin, I had some of the  solder mask cured on one of the samples and my hope was rekindled! With this burst of energy and enthusiasm I experimented with different timings for the exposure and got some impressive results
pcb with solder mask after curing and cleaning with acetone

first encouraging results using an actual pcb
At this point I could predict the results and my money did not go to waste after all.

 One more experiment though PCB exposure for etching!
This is the primary reason for this box and it had to be tried as well with the following great results!

pcb  after exposure and development

pcb after etching!

pcb with Solder mask applied to it!

 Now that the machine is useful, a Plexiglas cover will be perfect for the top. Using a laser cutter this was cut and fitted and now the box is complete at least for single sided boards.


For double sided exposures I will have to finish the top, but I am impressed with the results I have got already!


THE QUEST CONTINUES!


Wednesday, 13 November 2013

Make the Easiest AVRISP for your hardware hacking expeditions

I have always found my self in the chicken egg situation when making electronics using microcontrollers. Many open source programmers are based on microcontrollers which require specific firmware to be uploaded before they become useful or they require specific hardware. There are quite a number of open source designs of avr ISPs namely

USBASP

USBasp is a USB in-circuit programmer for Atmel AVR controllers. It simply consists of an ATMega88 or an ATMega8 and a couple of passive components. The programmer uses a firmware-only USB driver, no special USB controller is needed.
This is a great programmer but you must have another programmer to make the circuit useful.

Parallel Port programmer 

Serial Port Programmer

These are  great ones since they do not require any firmware on them but the down side is that a parallel port or the Serial port, which are absent in most new computers, is required to upload firmware to the mcu.

AVR Development boards 
There are quite a large flavour of these platforms offered by various vendors and they are great. They offer many features and support many chips but they are far out of reach for newbies especially in Kenya. 

To avoid all these problems then I used a design that programmes itself. This ISP has been used to upload bootloaders and burn fuses on new ATMEGA chips using the arduino IDE. What many people do not know is that with avrdude, you can upload firmware to any avr chip.
 In the Arduino examples there is an arduino ISP sketch that when uploaded turns an Arduino board into a programmer as seen in this Youtube video.

I had an arduino proto shield left over from previous and I went ahead and converted it into my isp following this design and below are pictures of what I made.


After the programmer is made see an avrdude tutorial here to upload firmware or use the arduino ide with the programmer for uploading firmware.

Snapshot of command line window with avrdude in action

 Feel free to ask any questions in the comments.

Happy hacking 


Monday, 15 July 2013

Unlock your potential with open source hardware


For long many have been scared of starting off in embedded systems and programming because of the fallacy that they it is hard. Times have changed and today there exists open source tools and platforms like that make the entry level requirements have gone qiute low. It is amazing the kind of projects that have been powerded by these platforms from blinking an led to going to space with ardusat.
 Just to mention a few platforms;

1. arduino is based on 8 bit avr microcontrollers with the new arduino Due for 32 bit microcontrollers.
"Arduino is an open-source electronics prototyping platform based on flexible, easy-to-use hardware and software. It's intended for artists, designers, hobbyists, and anyone interested in creating interactive objects or environments." by Arduino Team
Arduino Due

Mbed : Based powerful 32 bit ARM microcontrollers.
"The mbed rapid prototyping platform is the fastest way to design products based on ARM microcontrollers.
The project is being developed by ARM, its Partners and the contributions of the global mbed Developer Community" by the mbed team.

mbed FRDM KL25Z

pinguino :Based on ©Microchip microcontrollers
"Pinguino is an Arduino-like board based on a PIC Microcontroller. The goal of this project is to build an integrated IDE easy to use on LINUX, WINDOWS and MAC OS X. Arduino is a powerful tool with some defaults. One of its inconveniences are a no native USB interface on the chip and its code length." by the Pinguino team.


Many other projects are featured on wikipedia and are interesting to look at.

With all these project one the greatest emphasis is on getting people to do the projects without worrying too much about about the complexity of  writing the underlying complex routines. They make you design your application easily without spending hours learning pragma, configuration bit or command line compilers. Most provides USB Bootloaders. This means that there is small program running inside the microcontroller is responsible for transferring your user program to the program memory and handing over the control to this program afterwards. No programmer is needed, the microcontrollers can be reprogrammed over USB with a PC.
These platforms come with plenty of examples and libraries which come in handy for both the advanced users as well as the beginners. Not to forget the numerous support from users all over the world. With only a few hours of study you could well have finished some nice projects.

Sites like instructables have numerous projects with step by step directions on how to work with these nice little toys. From my childhood days, I learnt that playing with toys is most enjoyable if the toy is mine. for this reason head to  nerokas electronics shop, get your toy and let the fun begin.


Monday, 8 July 2013

First Kenyan Online Electronics Store

I have been building electronics in Kenya for sometime now and the greatest challenge is getting the parts needed for the projects. A long time ago I learned how to scavenge for parts from broken electronics and repurpose them for my own projects. This however has changed due to the revolution that is taking place in the Kenyan DIY scene. Many more enthusiasts and students have access to materials, tools and information that I never had access to while learning.

Most of the components I got were discrete and hardly did I get the exact parts I wanted especially microcontrollers. As time went by I discovered the electronics shops in Luthuli avenue in Nairobi. These shops have many of the electronics parts needed to do simple projects. To successfully shop for parts here you need to know the street names of some of the components to get to buy them else you leave without them for lack of proper "street"communication. For instance a potentiometer is called "volume" which is only one of the many applications of this device as a volume control knob in audio electronics. This is partly due to the fact that some of the people selling these parts do not even have an idea what they are selling.

One of the shops though, Masimo electronics, stocks most of the parts a DIYer would love to have from microcontrollers to the peripherals but the  problem is the pricing.  Do not be surprised to find an arduino duemilanov going for Ksh 15,000 or a 3mm led going for Ksh15 which is way too high. This makes me think that most of their components are overpriced and it is quite discouraging that they are taking advantage. To add insults to an injury they do not have an online shop or even a catalog which  the customers can even browse or windowshop for parts. Time has come for businesses to go digital but these guys have a long way to go.

Long we had waited for this scenario to change and it did when nerokas, a kenyan online electronics store was established. This is the one stop shop for all the parts an electronics DIYer would need. From the famous arduino to microcontrollers, from the raspberry pi to leds,GSM modules and many other electronics parts. You can place your order in the morning, pay via m-pesa and get your package the same day within Nairobi or get the package delivered by a courier of your choice if you are outside Nairobi. And to crown the cake, their prices are very friendly.

Whether you are building electronics projects for fun or a school project, head straight their website, or visit their facebook page for a glimpse of what they stock and am sure you will be amazed.

Lets build this Engineering momentum together by promoting our one of our own as we gear up towards vision 2030!

If I can get it in Kenya, why import?

Electronics tutorials coming soon! watch this space.


Sunday, 23 June 2013

Innovate Kenya Camp at Maseno School

I have always wanted to inspire the youth especially those in high schools because they are basically at the tipping point in their lives where my small input might be just what is required to tip the balance to a favourable future.Therefore last weekend when a friend of mine from Innovate Kenya  invited me to their innovation camp at Maseno School, I was more than willing to attend. Innovate Kenya is a nationwide innovation competition that involves high school students designing solutions for problems facing their communities. A total of ten projects were selected by judges to enter the final level where a prototype solution will be implemented by the students in the next five weeks. The prototyping of the ten finalist projects  is made possible by funding from Innovate Kenya.

The finalists received mentorship on how to move their ideas forward into the prototyping stage. To top it up the students were taken through the wallet project to enhance their design skills.

I also had the chance to meet Maxwell Collins who has designed an electronic voting machine using parts scavenged from scrap electronics. The 2007/2008 post election skirmishes that almost paralysed Kenya inspired him to design a system where human error and manipulation  is eliminated to ensure peaceful voting and tallying.

They say pictures are worth a thousand words, see for yourself below.....


Some of the Harvard students who volunteered to mentor the teams

Presentation by students from Precious Blood girls High School

Presentation by Kisumu Girls Students 

The audience enjoying a light moment

Presentation by Students from St Elizabeth Girls High School

Presentations by Students From Kilifi High School

Presentation by Students from Precious Blood  Girls High School

Add caption

Interacting with Kirotich of Alliance High School

Students from Mary Leaky pose for a picture with their teacher

Design thinking exercise (The wallet project)

Design thinking exercise (The wallet project)

Design thinking exercise (The wallet project)

Posing with Maxwell and the voting  machine 

Testing the Machine

Alliance High school Team

Preserving the wild with Precious blood Girls high School and their teacher 

Showcasing the products of the wallet project

KTN in the area!

LED lighting Solutions

Maxwell

The Voting Machine

Led lighting Solutions for Security lights

Music festival participants from Ahero girls high school

Mentorship and project review

Mentorship and project review

Mentorship and project review

Mentorship and project review

Mentorship and project review

Mentorship and project review

Mentorship and project review


Maxwell Showcasing the voting machine

Lets cast some votes 

Led lights demo


Alliance high school students are  awarded

Mary Leaky girls high school sudents are awarded certificates 

Kisumu girls Students are awarded certificates

Precious Blood girls Students are awarded certificates 

Precious blood girls high school students are awarded certificates 

Kilifi high School students are awarded certificates

St elizabeth Students get their awards

Maseno School students get their awards

Pumwani high School students get their award

The Awesome team: Innovate Kenya staff on the back row,  studnents and their teachers

Yeah hurrah! We've made it

I am looking forward to the august event when the students present their prototypes.